Tuesday, April 23, 2024

Enchanted Forest

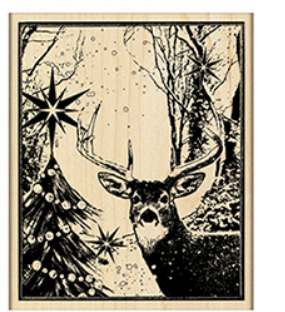
"Our classic woodblock stamps never go out of style...

That's the quote I found on the August 15, 2014 Penny Black Blog when I searched for this image.  I recently purchased the wood mounted rubber stamp and removed the wood of course, but it's obviously an older image.  With my love for Penny Black images, I'd have to agree with this quote.


I stamped the image with Momento Desert Sand even though I'm not good with no line coloring.  I used Copic markers for the coloring which are referenced below.  

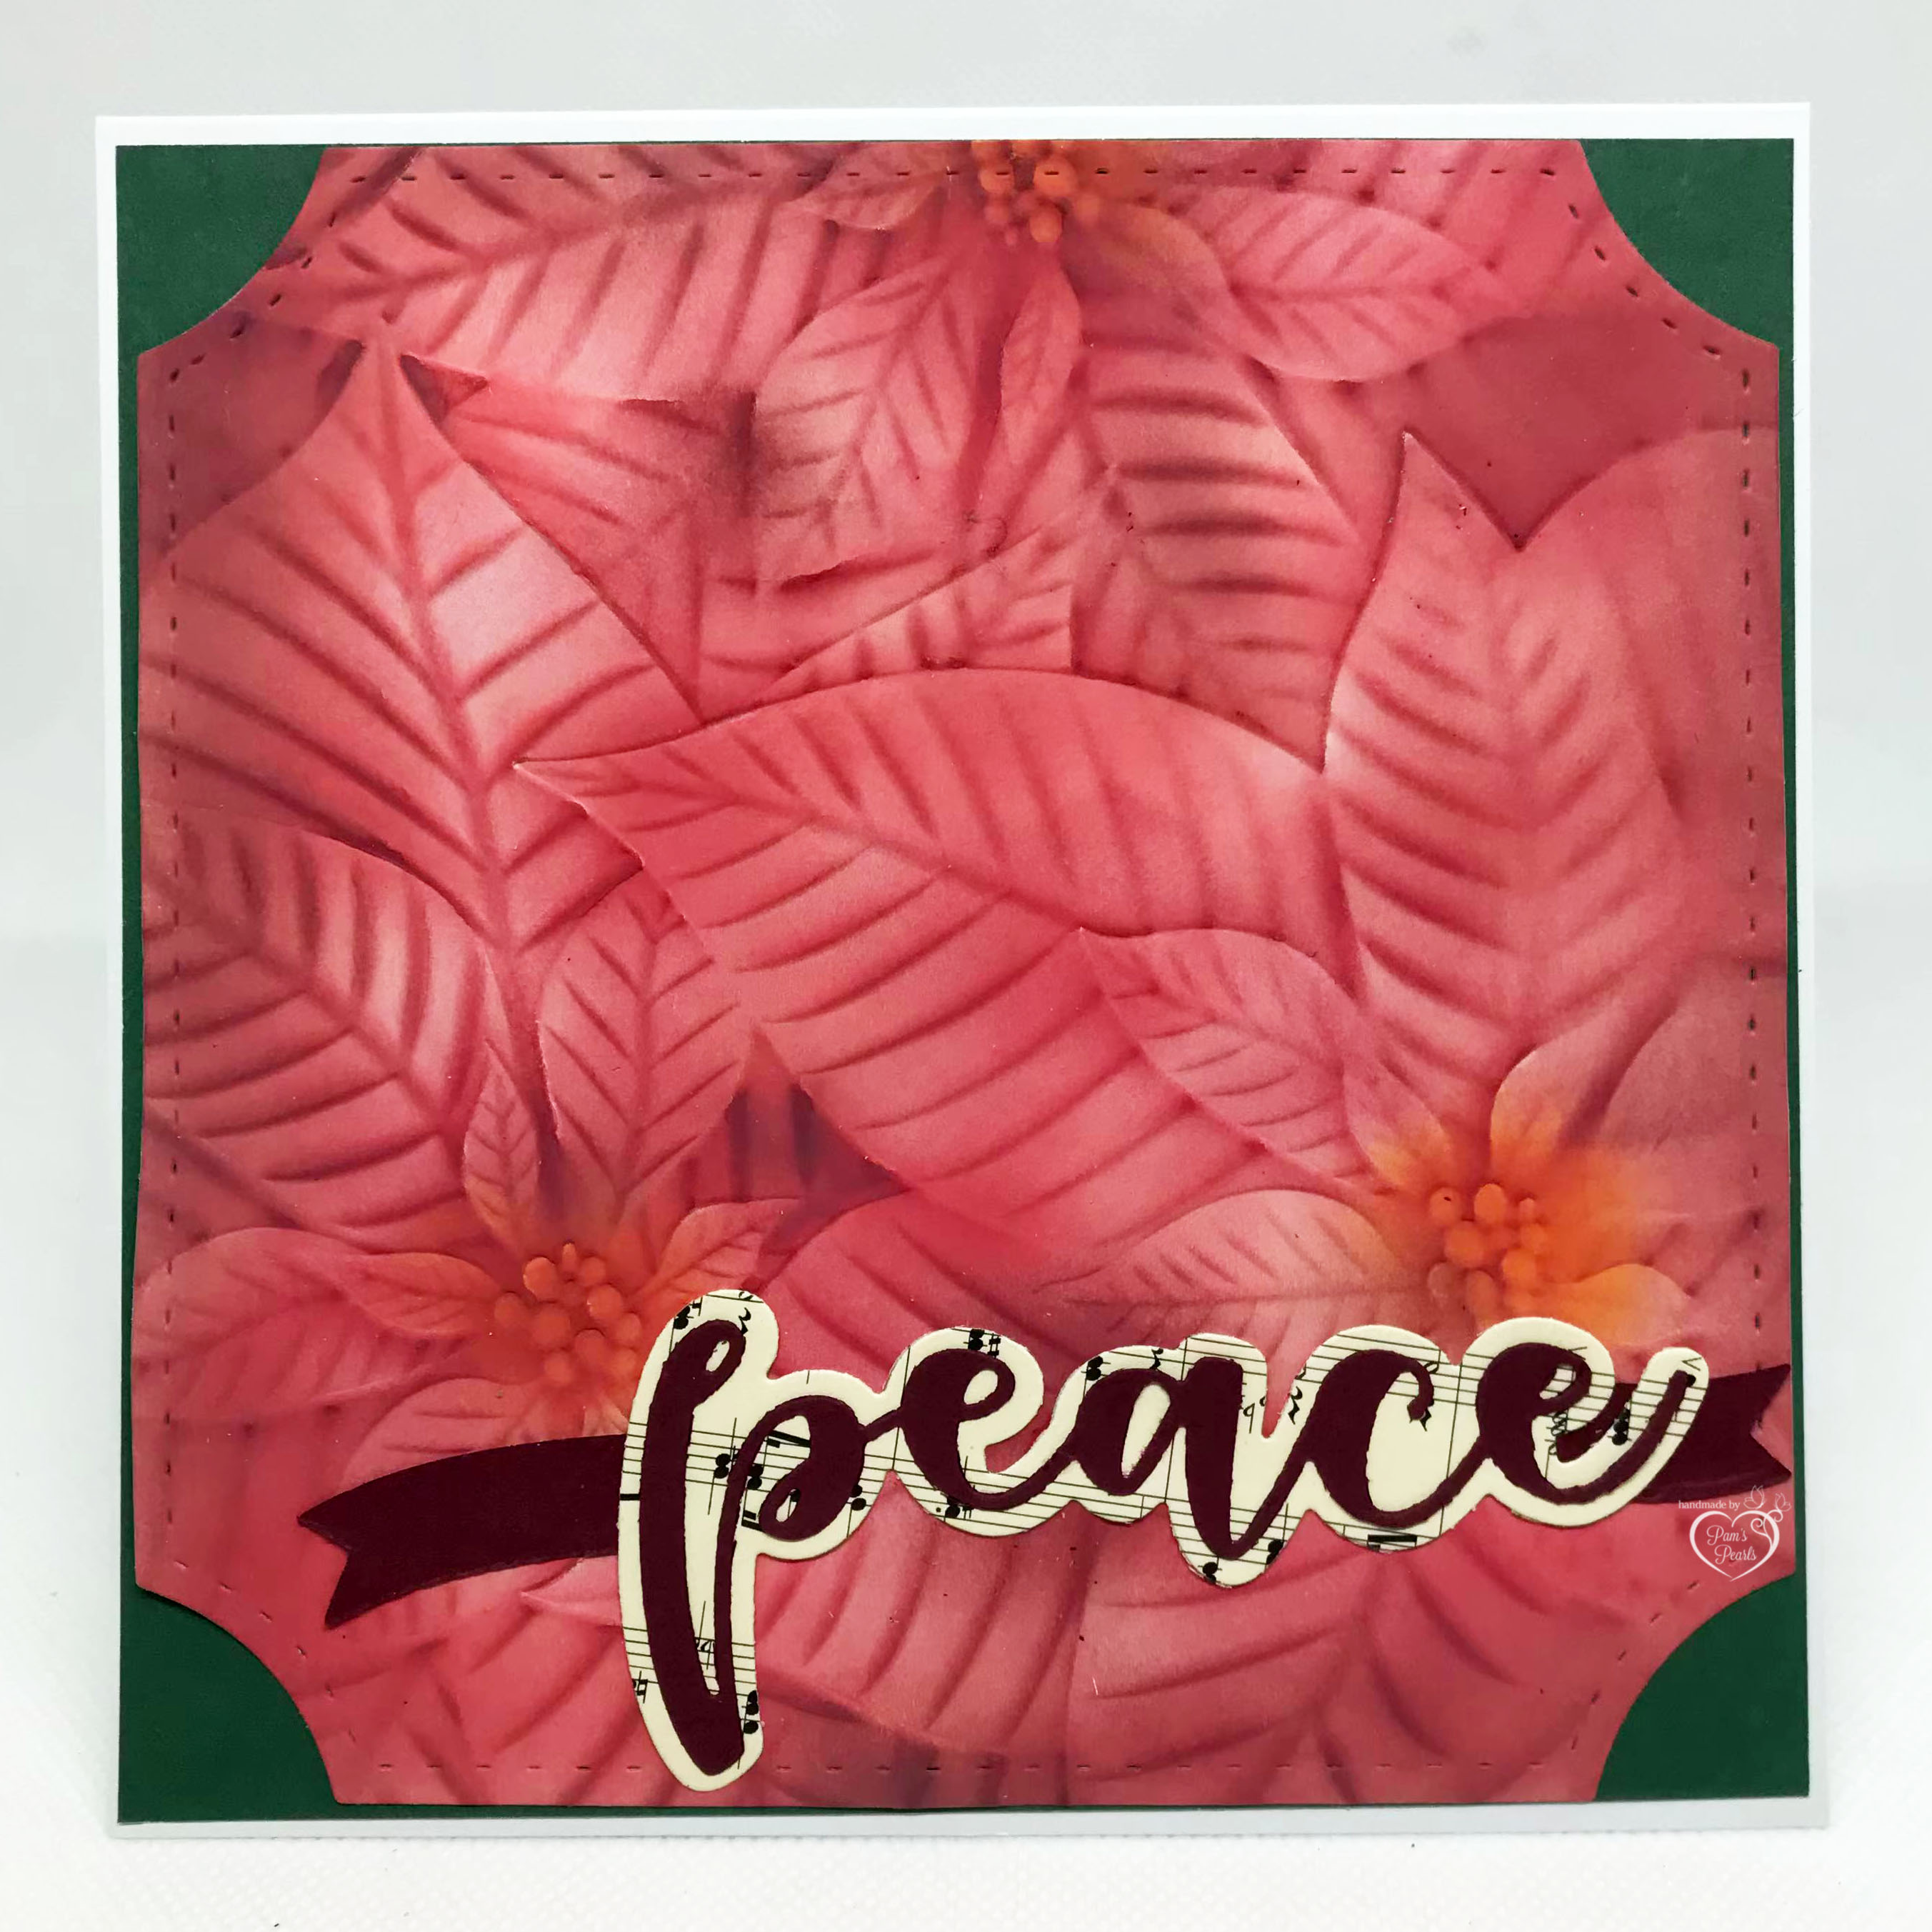
After trimming close to the edges of the completed image, I cut the green patterned mat to 5 1/4" square and the brown cardstock base to 5 1/2" square.  I also die cut the 'JOY' letters out of coordinating yellow cardstock.  Then I secured the layers as shown and added Diamond Stickles to the snowflakes to give the card some sparkle.  Since this card will go into storage until the holidays, I'll add the bow at that time. 

Thank you for stopping by today to view my blog. I enjoy sharing my work with you and invite you to 'Follow' my blog and to visit my site - "Not Just Scraps' on Facebook - where you can purchase my cards. 

I will be entering this card in the following challenges: 

BYSH Cardmakers: Spring into Christmas 2024 

52 Christmas Card Throwdown ~ April  

Peace on Earth ~ Challenge 62  

C.R.A.F.T. ~ Challenge 716 ~ Christmas  

Penny Black Saturday Challenge ~ April


Pam's Pearls


Copics 

Deer; E21, E23, E25, N6, Tree Trunks: E13, Christmas Trees: G40, G43, YG64, BG05, Stars: Y02, Y15, Y19


Products 

(linked to 2014 blog posting)


Monday, April 22, 2024

Learning to Dance

Happy Monday from the All Dressed Up Digital Stamps Design Team!  We're posting another round of inspirational cards of the new April images from designer Wendy Burns. 

I've selected Puddle Ducks for my project card.


After sizing the image for an A2 card, I printed her on 110# Neenah cardstock.  I used Copic markers for coloring the image and adding the background.

I used the Poppy Stamps, Raining Frame with the navy cardstock for the matting and a yellow cardstock card base.  After securing the matting and the image to the card base, I added the sentiment  from Altenew, Dance in the Rain.  For the finishing touch, I added the magenta ribbon and bow at the fold.  The die cut umbrella was part of the Raining Frame and was the perfect added touch to the top of the bow. 

Thank you for stopping by today to view my blog. I enjoy sharing my work with you and invite you to 'Follow' my blog and to visit my site - "Not Just Scraps' on Facebook - where you can purchase my cards. 

I will be entering this card in the following challenges: 

The Paper Shelter ~ Challenge 592 ~ April Showers  

Sheepski Designs ~ Challenge 85  

Sparkle Forum ~ April Challenge  ~ April Challenge  

Double D ~ April Challenge ~ Water Related


Pam's Pearls


Copics  

Hair: E21, E23, E25, Jacket: Y11, Y15, Y18, Jeans: B23, B45, Top: RV09, RV25, RV17, Boots: RV17, Y18, B97, Hair Ribbon: RV09, RV17, Ducks: Y35, Y17, Puddle: B01, B21, Path: E30, E31, E42, E52, Rocks: W2, W4, Grass: G46, G43, Flowers & Stems: YR04, YG93, YG95, Sky: B000, BG0000, Field: YG61, Trees: E23, G24, G29, YG63, YG61, Clouds: N1, C0, C3, B60   

Products 


Sunday, April 21, 2024

Wishing You Peace

Like most years, here it is the end of April and I've failed miserably at making a few Christmas cards each month!   I was reminded yesterday of the Spring into Christmas 2024 {BYSHC} Linky Party which is well underway, so I better hurry if I'm going to get any entries in for that! 

I pulled out the Altenew, Perfect Poinsettias 3D Embossing Folder and my Distressed Oxides and this is what I came up with. 


For the Distressed Oxides, I used Carved pumpkin for the centers, then Lumberjack Plaid, Festive Berries and Aged Mahogany for the petals and Black Soot for deep shadows.

For the sentiment I used W9plus Peace Shadow die and split the banner adding a piece on each end of the word.   I secured a dark green matting on the card base, then added the completed image and sentiment as shown.  Since this will go into storage for a while, I will add a bow when it's time to mail the card later this year. 

Thank you for stopping by today to view my blog. I enjoy sharing my work with you and invite you to 'Follow' my blog and to visit my site - "Not Just Scraps' on Facebook - where you can purchase my cards. 

I will be entering this card in the following challenges: 

Spring into Christmas 2024 {BYSHC} Linky Party

Peace on Earth ~ Challenge 62   

The Holly and The Ivy Christmas ~ Challenge 161  

Altenew Inspirational Challenge ~ April 


Pam's Pearls


Products 


W9 Plus, Peace


Saturday, April 20, 2024

You're Always In My Thoughts

Today I'm back with the Design Team for Polkadoodles Crafting as we share our cards with a wrap.  

I selected Polkadoodles Lilac Haze Watercoloured Flowers. 


This image is great for a mini slimline card and the package comes with sentiments and digital papers.  I selected the green striped paper and layered the image on top, sizing them to print just under 4" x 6".  The sentiment I selected was printed in another area of the layout. 

After printing I used my Copic markers and colored the flowers in bold shades of red and the leaves in shades of green to match the background paper. When completed, I die cut the edges and secured it to the coordinating card base. 

For the card wrap, I basically laid the card in the center of the long side of the 8 1/2 x 11 paper, then drew the triangle from the top corners of the card to the outside bottom corner of the paper.  Then I trimmed along those lines and creased and folded at the sides of the cards.  

Once folded and secured at the bottom, I added the tiny green scalloped edge and the die cut sentiment at the center of the 'V' to complete the card design.


Thank you for stopping by today to view my blog. I enjoy sharing my work with you and invite you to 'Follow' my blog and to visit my site - "Not Just Scraps' on Facebook - where you can purchase my cards. 

Be sure to check out all the Design Team cards and join us in Challenge 16!

I will be entering this card in the following challenges: 

A Perfect Time to Craft ~ April  

Beautiful Blossoms ~ April ~ Challenge 16  

Daisy Chain ~ Challenge 84 ~ Not a Square  

Word Art Wednesday ~ Week 643-644


Pam's Pearls


Copics 

Small Leaves: BG09, BG07, Large Leaves: BG57, BG15, Flowers: R14, R22, R24,  YR23, YR27


Products 


Friday, April 19, 2024

She Will Not Fall

Today's card was a special remake request of the one I made for her several years ago.  I guess I'm not the only one that loves this little stained glass angel especially when paired with the Psalm 16:5.


Rarely do I work 'in reverse' (picking my paper first) but for this card I wanted to use this beautiful marbleized paper from Craft Consortium.   I sized the stained glass angel to about 3" tall and the scripture to about 2" tall. 
                        
I used my Copic markers to color the angel and tried to use shades of green that would be complimentary to the colors in the paper.  My customer also provided a photo of the person she wanted the card for and I colored the angel's hair to match. When completed I carefully cut around the angel and then used Copic BG49 to outline the edges and cover any white paper core.  

I used Tattered Lace Nesting Beaded Chain Square Dies for the background paper and for the gold metallic paper.  The sentiment was die cut using Gina Marie Designs Label Three. 
                                    
For the assembly I used a 6" card base with the fold on the left.  I secured the marbleized paper on the base then added gold horizontal banner across the middle and the vertical gold strip on the left.  I added fun foam behind the angel before securing her to the card base and adding the sentiment to the right.  Lastly I added the mint organza ribbon at the fold and tied the cross in the knot to complete the card design. 
                      

Thank you for stopping by today to view my blog. I enjoy sharing my work with you and invite you to 'Follow' my blog and to visit my site - "Not Just Scraps' on Facebook - where you can purchase my cards. 

I will be entering this card in the following challenges: 

Crafty Gals Corner ~ Challenge 254   

I Love Promarkers ~ Challenge 557 

Word Art Wednesday ~ Week 643-644  

Cards Galore Encore ~ April


Pam's Pearls


Copics  

Hair: E43, E42, E41, E40, E0000, R01, Gown: Y26, Y28, BG23, BG07, BG09, BG15, BG13, BG57, BG45, BG34, N7


Wednesday, April 17, 2024

Keep Blooming

Bears and Sunflowers are always a winning combination.  This cute little image from Di's Digital Stamps is no exception.  She is named 'Happiness is a Sunflower Bear'.


 For this card, I sized the image to just under 4" tall, laid it out to be on the left edge of the card front and printed it on Neenah cardstock.  I used Copic markers for the coloring and then used Gina Marie Designs Label 3 for the decorative edge.  

I selected a chocolate brown card base and secured the green patterned matting to the front.  Next I secured the completed image in the center.  The sentiment is from my stash and I added a few foam squares behind it to raise it before securing to the card. 

The yellow/gold strip of paper was just an add on but I thought it gave a good contrast and helps show off the jute string  at the fold. 

Thank you for stopping by today to view my blog. I enjoy sharing my work with you and invite you to 'Follow' my blog and to visit my site - "Not Just Scraps' on Facebook - where you can purchase my cards. 

I will be entering this card in the following challenges: 

Give a Crafters a Cookie ~ Challenge 191 ~ Happy Birthday  

Four Seasons ~ April ~ Spring  

Cutie Pie Challenge ~ Challenge 193 ~ Simply Cuties  

Di's Digi Designs ~ April ~ Scraps/Stash


Pam's Pearls


Tuesday, April 16, 2024

A Part of Your Heart

Although I've been making cards for many years, the card I'm sharing today was a 'first' for me.

I've have a lot of friends who own horses and I've even had beautiful pastures and horses on our property in the past.  But I've never had any of those friends loose their beloved horse.  

After several long weeks of watching Mateo struggle with bone cancer, he passed during the recent eclipse. 


 As I searched around for ideas for this card I ran across this digital image.  It was the perfect silhouette of my friend and her horse. Although normally I would have used an image to complete with my Copic coloring, I felt I couldn't top the feelings shown in this photo. 

After sizing the image and sentiment for my 6" card base, I printed them on my Eco-tank ink jet printer to get a really good quality print.  I secured the image to the base then added the aqua strip and the sentiment at the bottom.  To finish the design I added the black twine at the fold and the heart charm at the bow. 

The card was filled with love and prayers and sent on to our beautiful friend Lilli. 

Photos by 
Lanette Rickens


Thank you for stopping by today to view my blog. I enjoy sharing my work with you and invite you to 'Follow' my blog and to visit my site - "Not Just Scraps' on Facebook - where you can purchase my cards. 

I will be entering this card in the following challenges: 

Crafty Animals ~ Challenge 82  

Farm Quest General Store ~ Challenge 15  

Lil Patch Crafty Friends ~ Challenge 227


Pam's Pearls

Monday, April 15, 2024

I'm Always Here For You

I'm back one more time today, this time with the Design Team for Julia Spiri and World Wide Crafters and Colourist. 

Have you ever felt like you missed the party?  I was so very honored when I was asked to join this wonderfully talented team last month.  But now it is sadly a short lived time as this blog challenge is being closed.  Today's edition for the month of April will be the last edition of Julia Spiri's World Wide Crafters and Colourist Challenge.  Be sure to continue to follow her work on her Facebook page at Julia Spiri Art.

For today's project I have selected her Enchanting Rainfall.


I sized the image for an A2 card front and used Copic markers for coloring.  I carefully cut away the back side of the 'white space' behind the girl's hair and then decided to trim it away above the umbrella also. 

I used the Lappo Grid Lattice die with the light dusty rose cardstock and added a navy background.  After securing these two layers together, then I added them to the card front.  Next I positioned the completed image 'Enchanted Rainfall" on the top and secured along with the sentiment strip. This completed the design.

Thank you for stopping by today to view my blog. I enjoy sharing my work with you and invite you to 'Follow' my blog and to visit my site - "Not Just Scraps' on Facebook - where you can purchase my cards. 

I will be entering this card in the following challenges: 

Word Art Wednesday ~ Week 643-644  

Crafting Happiness ~  Challenge 170 ~ Rainy Weather  

Just Us Girls ~ Challenge 772 ~ Rain


Pam's Pearls


Copics 

 Hair: N6, N5, N4, C3, B41, Dress: B000, Umbrella:  R21, BV20, BV23, Handle: E33, Lace: E41, Eyes: B05, B01, Lips: R01, R000


Products 


Such a Good Friend

I'm back for my mid day posting with the All Dressed Up Digital Stamps Design team for our inspirational posting.  I've selected 'Kitty Hearts' for my project card and made a moonlight scene with a bit of mixed media look to it. 


I'm always in such awe at the talented ladies who can add beautiful backgrounds to images that are left just there with no background or grounding.  They can really make the image come to life!  I gave this one a shot, but a lot to be desired.                                                     

I used Copic markers after printing the image on Neenah 110# cardstock and masked the moon circle in the center back. Then added the different shades working out to the darkest blue.  The area between the girl and her kitty and the ground, I didn't want it to be grass or brown ground, so I selected the dusty rose so it resemble the shades of a marsh at night.

Lastly I added the raised sentiment - I love the way the artist has the kitty snuggled up closely by this girl on the tree.  A great image for many occasions.

Thank you for stopping by today to view my blog. I enjoy sharing my work with you and invite you to 'Follow' my blog and to visit my site - "Not Just Scraps' on Facebook - where you can purchase my cards. 

I will be entering this card in the following challenges: 

Creative Fingers ~ Challenge 275  

A Place to Start ~ A Splash of Color  

Through the Purple Haze ~ Challenge 214


Pam's Pearls


Copics 

Hair: E37, YR27, YR23, YR21, Shirt: Y19, Dress: BG15, BG57, Branch: E71, Leaves: YG93, YG97, Cat: N3, N5, Hearts: BG57, Background: B37, B39, FBG2, RV34, RV00, V95, RV93, RV91, V93, Y00


Products 


Cupcake Birthday Wishes

Good Monday morning!  Today is a special opening for the Classic Design Challenge Blog as this month we celebrate our 8th Birthday!  Over on the Challenge Blog be sure to submit your 'Handmade Birthday Card' for an additional chance to win a Birthday stamp set!

We have several sponsors this month ~ All Dressed Up Digital Images., Keen Crafters Design Papers, and Mirtillamente Digital Stamps and Papers.  For my Design Team project I've selected 'Cup Cake' from All Dressed Up and also used the Happy Birthday digital papers from Keen Crafters Design.


This is another great All Dressed Up image with lots of details and yet it has lots of area that you can add your own touch.  I started by sizing the image to about 4" x 6" and printing on Neenah 110# cardstock.  I used my Copic markers for coloring. Since I was making my card an inside scene, I added a baseboard just above the start of the table legs.  Then I colored the floor a light wood color.   That left two random flowers 'on the floor' instead of the ground, so I added tiny flower pots for those.

Next I selected the pink confetti paper that I wanted to add in the background from the Keen Crafter sponsor.  I printed a piece about 5" x 3".  I carefully cut off the top of the colored image above the banner and top of the balloons.  Then I positioned the pink piece back over area and overlapped to connect to the bottom of the card. 

Once these two pieces were secured together, then I die cut them using Gina Marie Designs, Label 3 to get the pretty decorative edge.  I used the same die set for the burgundy mat.  After selecting a Kraft card base, I matted the dark green background matting, then secured the burgundy, and the two patterned images.  

After all the layers were secured, then I used the gold stickles and added the accents at the balloon banner rope  and on the cupcakes.  Lastly I raised the sentiment with fun foam before securing at an angle on the left corner.
                               
Be sure to pop over to the Classic Blog Challenge now and enter your handmade cards,                         
                                 
Thank you for stopping by today to view my blog. I enjoy sharing my work with you and invite you to 'Follow' my blog and to visit my site - "Not Just Scraps' on Facebook - where you can purchase my cards. 

I will be entering this card in the following challenges: 

CD Sunday Plus ~ Challenge 131  

Creative Inspiration ~ Challenge 13  

Paper Funday ~ Challenge 64  


Pam's Pearls


Copics 

Floor: E35, E37, E39, Wall: RV000, Tablecloth: BG11, Dress & Bow: BG11, BG13, Hair: E41, E42, E43, Tray: Y26, Cupcake: Y23, RV55, RV63, Balloon: RV53, RV69, BG49, BG45, Flowers: RV09, YG63, Dog: N0, Pots: E55, E57, Shadow: W2


Products


Keen Crafters Designs, Happy Birthday